• Home
  • Weathervanes
    • In-Stock Weathervanes
    • Animals
    • Aquatic
    • Arrows & Banners
    • Birds
    • Boats
    • Cars, Trucks, & Airplanes
    • Custom Weathervanes
    • Dogs
    • Fantasy & Mythology
    • Fish & Whales
    • Horses
    • Plants & Insects
    • Sports & Culture
    • Repairs and Restorations
  • Roof Finials
    • In-Stock Finials
    • Ball Finials
    • Ball & Cone Finials
    • Figurative Finials
    • Rotating Finials
    • Round Finials
    • Scroll Finials
    • Spike Finials
    • Finial Bases
    • Repair and Restorations
  • Roof Caps
    • Bases for Vanes or Finials
    • Copper Roof Caps Quick!
  • Parts and Accessories
    • All Parts and Accessories
    • Balls and Ornaments
    • Bases
    • Dedications
    • Directionals
    • Hooks
    • Lightning Rod Parts
    • Mounting Brackets
    • Posts
    • Rings
    • Spacers
    • Time Capsules
  • Other Interests
    • Antique Lightning Rods
    • Cupola Plans
    • Repairs and Restorations
    • Weathervane Workshops
  • Information
    • About Ferro
    • Contact Me
    • Choosing A Weathervane
    • Custom Quote Request
    • Directions to the Studio
    • FAQs – And answers!
    • Finishes
    • Grounding
    • Policies
    • Reading List
    • Repairs and Restorations
    • Scrapbook
    • Sizing Weathervanes and Finials
  • Installation
    • Aluminum Weathervanes
    • Assemble Copper Vanes
    • Grounding
    • Installing Copper Vanes
    • Roof Finials / Roof Caps
  • Projects

Weathervanes, Finials, Spires, Roof Caps, Parts, Repairs, Restorations, Stock or Custom.

ferrovanes@gmail.com
$0.00
No products in the cart
Go to shop
Ferro Weathervanes Ferro Weathervanes Ferro Weathervanes Ferro Weathervanes
  • Home
  • Weathervanes
    • In-Stock Weathervanes
    • Animals
    • Aquatic
    • Arrows & Banners
    • Birds
    • Boats
    • Cars, Trucks, & Airplanes
    • Custom Weathervanes
    • Dogs
    • Fantasy & Mythology
    • Fish & Whales
    • Horses
    • Plants & Insects
    • Sports & Culture
    • Repairs and Restorations
  • Roof Finials
    • In-Stock Finials
    • Ball Finials
    • Ball & Cone Finials
    • Figurative Finials
    • Rotating Finials
    • Round Finials
    • Scroll Finials
    • Spike Finials
    • Finial Bases
    • Repair and Restorations
  • Roof Caps
    • Bases for Vanes or Finials
    • Copper Roof Caps Quick!
  • Parts and Accessories
    • All Parts and Accessories
    • Balls and Ornaments
    • Bases
    • Dedications
    • Directionals
    • Hooks
    • Lightning Rod Parts
    • Mounting Brackets
    • Posts
    • Rings
    • Spacers
    • Time Capsules
  • Other Interests
    • Antique Lightning Rods
    • Cupola Plans
    • Repairs and Restorations
    • Weathervane Workshops
  • Information
    • About Ferro
    • Contact Me
    • Choosing A Weathervane
    • Custom Quote Request
    • Directions to the Studio
    • FAQs – And answers!
    • Finishes
    • Grounding
    • Policies
    • Reading List
    • Repairs and Restorations
    • Scrapbook
    • Sizing Weathervanes and Finials
  • Installation
    • Aluminum Weathervanes
    • Assemble Copper Vanes
    • Grounding
    • Installing Copper Vanes
    • Roof Finials / Roof Caps
  • Projects

Installing Roof Finials or Roof Caps

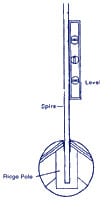
1. (SKIP TO STEP 3 IF INSTALLING A ROOF CAP ONLY.) First, determine if it is possible to drill a 3/4″ hole into solid wood in the peak of your roof for the bottom of the finial’s post. This is the best method for anchoring a finial.  Drill a plumb hole into the peak. Smaller finials 6″- 9″ depth. Larger Finials 10″-12″ depth.  Measure the post below the finial, deduct 1″ – 2″ and that is the depth for that finials’ post.

2. The finial’s bottom-most ornament should be about 1″ to 2″ above roof peak or roof caps’ peak.

3. Properly seal roof with roofing material before installing cap. **ROOF CAPS SHOULD BE USED FOR ORNAMENTAL PURPOSES ONLY and NOT for supporting a finial or weathervane or sealing roof from weather.**

4. Use PLENTY of clear adhesive silicone caulking inside cap, around screw holes, around bottom of post, and inside the tube opening where finial enters cap. Place caulk into the hole in the roof if installing a finial or weathervane.

5. If installing a finial alone, press post into caulked hole in roof. Make sure the joint where the post goes into the roof is well caulked and you’re done.

6. If installing both a finial and roof cap, use care to assure that edges on bottom of cap will not get caught, push firmly, but not forcibly, onto roof peak. Secure with copper coated stainless steel screws in holes provided by placing 2 opposite screws to start. (Drill holes if not provided). Double-check plumb and finish securing cap to roof. Finish by placing caulking around the inside of the bushing in the cap and slide the finial down into cap and into roof.  Place more caulk at the joint where the post enters the cap. (tip: Wet silicone cleans easily with a cloth rag damp with paint thinner.)

NOTES:

Make sure to drill the hole plumb!

Copper is soft and will bend and dent easily. Use caution when handling!

This sheet is intended as a suggestion. Use any superior methods of installation available!

For best results, use the best quality  adhesive silicone caulking available;  applying liberal amounts throughout the installation.

Installing a Finial on a Cupola

USING A BRACKET OR ROOF MOUNT

1.)  Use a vise to bend saddle mounts to the correct pitch. Temporarily insert the post in  the mount and utilize to properly plumb. Using the mount as a template, position the mount in the desired location and drill mounting holes. Use a good quality 100% adhesive silicone caulking between the mount and roofing. Use stainless steel lag screws or bolts to secure the mount to the roof

2.) Using a sharp hacksaw and a vice, trim the weathervane post so that it extends no more than 12″ – 18″ above the mount (not including spindle). Apply 100% adhesive silicone caulking to coat the bottom 10″ – 12″ of the post.  Slide the post into the mount and wipe off the excess with a paint thinner dampened rag.  If there is a set screw, secure it now.  It is best to allow the adhesive caulk to set 24 hours before attaching the rest of the weathervane parts.

3.) Refer to assembly instructions to complete installation.

NOTE:

  • Mounting Brackets are not included with weathervanes and must be ordered separately. Click Here to view available mounting brackets.

  • GE 100% adhesive silicone caulk is recommended.

10637

Contact Information

Send us an email and we'll get back to you, asap!

Send Message

© [2020] · FerroWeathervanes.com. No portion of this site may be reproduced for profit. Feel free to reproduce portions for educational purposes as long as credit is given to Ferro Weathervanes. | Sitemap