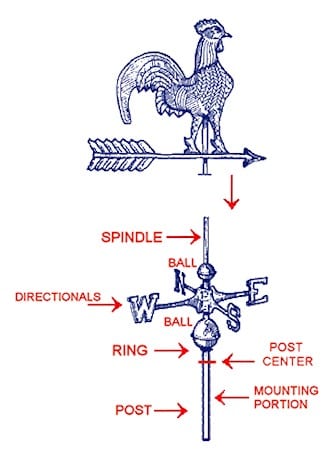
1.) Secure a ball ring about 2" above the peak of the roof (the bottom half of the post should be in the roof) (do not over tighten the screw in the ring) then, slide the large ball down the post to rest on the ring. If the ball is glass, slide the second ring down onto the top of the ball and secure in place to keep the glass ball from moving up and down. 2.) Slide them down the post to rest gently on the large ball, (CAUTION - Do not allow the directionals to fall onto the large ball or it will dent the ball). 3.) Slide the small ball onto the top of the post with the large hole first. It will stay at the top of the post. -If both holes are the same size on the small ball, then first slide a ring onto the post and secure it in place to allow the ball to sit at the top of the post. -If a retaining hook is needed (birds and airplanes), the retaining hook should be secured at the top of the post instead, and the small ball just below it. The figure and hook need to be installed simultaneously. 4.) Slide the directionals up so it is mid way in the space between the large and small balls. Rotate the "N" to north then secure the directionals in place by tightening the screw in each directional hub. 5.)Apply A little Permatex White lithium grease to the spindle to decrease friction and squeaking. Slowly slide the weathervane figure over the spindle. It should slide down easily and come to rest just above where the spindle is attached to the post. Adding a loose Teflon Ball Bearing at the top of the spindle tube also greatly reduces friction and noise.
NOTES:
-
Upgrade your Directionals. (See all the different Directionals we offer.) -
Upgrade from copper to colorful glass balls. (See all the beautiful Weathervane Glass balls available.) -
Do you need a different length or width post? (Select the perfect Weathervane Post for your application here.)


