• Home
  • Weathervanes
    • In-Stock Weathervanes
    • Animals
    • Aquatic
    • Arrows & Banners
    • Birds
    • Boats
    • Cars, Trucks, & Airplanes
    • Custom Weathervanes
    • Dogs
    • Fantasy & Mythology
    • Fish & Whales
    • Horses
    • Plants & Insects
    • Sports & Culture
    • Repairs and Restorations
  • Roof Finials
    • In-Stock Finials
    • Ball Finials
    • Ball & Cone Finials
    • Figurative Finials
    • Rotating Finials
    • Round Finials
    • Scroll Finials
    • Spike Finials
    • Finial Bases
    • Repair and Restorations
  • Roof Caps
    • Bases for Vanes or Finials
    • Copper Roof Caps Quick!
  • Parts and Accessories
    • All Parts and Accessories
    • Balls and Ornaments
    • Bases
    • Dedications
    • Directionals
    • Hooks
    • Lightning Rod Parts
    • Mounting Brackets
    • Posts
    • Rings
    • Spacers
    • Time Capsules
  • Other Interests
    • Antique Lightning Rods
    • Cupola Plans
    • Repairs and Restorations
    • Weathervane Workshops
  • Information
    • About Ferro
    • Contact Me
    • Choosing A Weathervane
    • Custom Quote Request
    • Directions to the Studio
    • FAQs – And answers!
    • Finishes
    • Grounding
    • Policies
    • Reading List
    • Repairs and Restorations
    • Scrapbook
    • Sizing Weathervanes and Finials
  • Installation
    • Aluminum Weathervanes
    • Assemble Copper Vanes
    • Grounding
    • Installing Copper Vanes
    • Roof Finials / Roof Caps
  • In the shop

Weathervanes, Finials, Spires, Roof Caps, Parts, Repairs, Restorations, Stock or Custom.

ferrovanes@gmail.com
$0.00
No products in the cart
Go to shop
Ferro Weathervanes Ferro Weathervanes Ferro Weathervanes Ferro Weathervanes
  • Home
  • Weathervanes
    • In-Stock Weathervanes
    • Animals
    • Aquatic
    • Arrows & Banners
    • Birds
    • Boats
    • Cars, Trucks, & Airplanes
    • Custom Weathervanes
    • Dogs
    • Fantasy & Mythology
    • Fish & Whales
    • Horses
    • Plants & Insects
    • Sports & Culture
    • Repairs and Restorations
  • Roof Finials
    • In-Stock Finials
    • Ball Finials
    • Ball & Cone Finials
    • Figurative Finials
    • Rotating Finials
    • Round Finials
    • Scroll Finials
    • Spike Finials
    • Finial Bases
    • Repair and Restorations
  • Roof Caps
    • Bases for Vanes or Finials
    • Copper Roof Caps Quick!
  • Parts and Accessories
    • All Parts and Accessories
    • Balls and Ornaments
    • Bases
    • Dedications
    • Directionals
    • Hooks
    • Lightning Rod Parts
    • Mounting Brackets
    • Posts
    • Rings
    • Spacers
    • Time Capsules
  • Other Interests
    • Antique Lightning Rods
    • Cupola Plans
    • Repairs and Restorations
    • Weathervane Workshops
  • Information
    • About Ferro
    • Contact Me
    • Choosing A Weathervane
    • Custom Quote Request
    • Directions to the Studio
    • FAQs – And answers!
    • Finishes
    • Grounding
    • Policies
    • Reading List
    • Repairs and Restorations
    • Scrapbook
    • Sizing Weathervanes and Finials
  • Installation
    • Aluminum Weathervanes
    • Assemble Copper Vanes
    • Grounding
    • Installing Copper Vanes
    • Roof Finials / Roof Caps
  • In the shop

Assembly & Installation of Aluminum Weathervanes

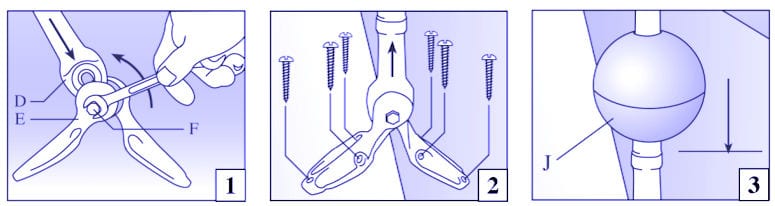
1.) Loosen bolt F to adjust the bracket. Insert post D between halves of bracket E. Slightly tighten Bolt F to hold bracket on post.

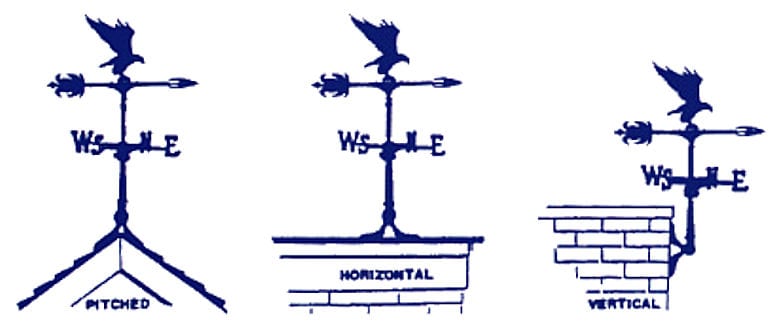
2.) Attach Post and Bracket assembly to the roof in desired location with six #12 stainless steel screws (recommended but not provided due to wide variations in mounting conditions). Hold post 90° plumb and firmly tighten bolt F to clamp post and bracket.

3a.) Slide large ball J onto post. Attach directional letters G to post, E-W first, then H with N-S. The N-S directional letters should interlock with E-W. Adjust N to point north and tighten set screw I (DO NOT OVER TIGHTEN!). Then slide small ball K into place above directionals.

3b.) If arrow A and ornament B are one piece, proceed to step 4. If arrow and ornament are separate pieces, attach by aligning the holes in the base of the ornament, but with the bulk of the surface of the ornament toward the tail of the arrow. The arrow and ornament assembly is designed to be slightly “Tail Heavy” in order for the arrow to remain pointed into the wind. Attach with screws C provided.

4.)  Place arrow and ornament assembly over mast pin. No lubrication is necessary.

10637

Contact Information

Send us an email and we'll get back to you, asap!

Send Message

© [2020] · FerroWeathervanes.com. No portion of this site may be reproduced for profit. Feel free to reproduce portions for educational purposes as long as credit is given to Ferro Weathervanes. | Sitemap